(function() {
document.addEventListener('DOMContentLoaded', function() {
var componentMetadata = JSON.parse('\x7b\x22componentName\x22\x3a\x22Breadcrumb_85c1a734-5429-4975-8674-5feefa134d02\x22,\x22deferOptions\x22\x3a\x7b\x22deferComponent\x22\x3afalse,\x22deferType\x22\x3a\x22None\x22,\x22deferId\x22\x3a\x22r387169bff0be412dafe2d62579b7b4ab\x22,\x22deferredContainerId\x22\x3a\x22\x2fcommonBreadcrumb\x22,\x22deferredContainerView\x22\x3anull\x7d,\x22viewName\x22\x3a\x22Breadcrumb\x22\x7d');
var configuration = {"links":[{"url":"/","label":"Home"},{"url":"/everyday-eats/dinner-tonight/how-to-use-an-instant-pot","label":"How to Use an Instant Pot®"}]};
var moduleName = 'breadcrumb';
var isVueModule = true;
GeneralMills.PandoSites.RegisterControlInstance(moduleName, configuration, componentMetadata, isVueModule)
});
})();
(function() {
document.addEventListener('DOMContentLoaded', function() {
var componentMetadata = JSON.parse('\x7b\x22componentName\x22\x3a\x22ActionToolbar_bcfe5168-4c6e-4b8a-8181-233a0a250020\x22,\x22deferOptions\x22\x3a\x7b\x22deferComponent\x22\x3atrue,\x22deferType\x22\x3a\x22OnDemand\x22,\x22deferId\x22\x3a\x22r038aae23393a4478bc1aa567cb89351a\x22,\x22deferredContainerId\x22\x3a\x22\x2ffloatingActionToolbar\x2ffloatingActionToolbar_interop\x22,\x22deferredContainerView\x22\x3a\x22InteropDeferWrapper\x22\x7d,\x22viewName\x22\x3a\x22ActionToolbar\x22\x7d');
var configuration = {"contentId":"85c1a734-5429-4975-8674-5feefa134d02","toolbarSettings":{"id":"bcfe5168-4c6e-4b8a-8181-233a0a250020","regAction":"FAVORITE","eSourceCode":14171,"namePassedToEvents":"ArticleStandardLongFormToolbar","buttons":[{"providerName":"pinterest","providerNamePassedToEvents":"Pinterest","shareUrlFormat":"//pinterest.com/pin/create/link/?url={0}","id":"63cf42f0-8fed-4b1c-acbe-0fe44811231d","allowedForAnonymousUsers":true,"type":"Social","displayName":"Pinterest","toggleDisplayName":"","namePassedToEvents":"Pinterest","cssClassName":"atButtonPinterest","privacyOptOutMessage":"\u003cdiv class=\u0027privacyMessage\u0027\u003e\n\u003ch3\u003eThis feature is not available with your current cookie settings.\u003c/h3\u003e\n\u003cp\u003eYou can \u003ca href=\u0027#\u0027 data-show-preference-center=\u00271\u0027\u003eupdate your privacy settings\u003c/a\u003e to enable this content. Please enable “Functional Cookies” to use this feature.\u003c/p\u003e\n\u003c/div\u003e","showPrivacyOptOutMessage":false},{"addFavoriteErrorMessage":"Sorry, something went wrong. Please save again.","removeFavoriteErrorMessage":"Error occurred while removing from favorites","regAction":"FAVORITE","eSourceCode":14171,"isCurrentUserAnonymous":false,"isFavoriteItem":false,"id":"351369d5-f1b1-4a90-b495-16074575bb8a","allowedForAnonymousUsers":false,"type":"Favorite","displayName":"Save","toggleDisplayName":"Saved","namePassedToEvents":"Favorite","cssClassName":"atButtonFavorite","privacyOptOutMessage":"\u003cdiv class=\u0027privacyMessage\u0027\u003e\n\u003ch3\u003eThis feature is not available with your current cookie settings.\u003c/h3\u003e\n\u003cp\u003eYou can \u003ca href=\u0027#\u0027 data-show-preference-center=\u00271\u0027\u003eupdate your privacy settings\u003c/a\u003e to enable this content. Please enable “Functional Cookies” to use this feature.\u003c/p\u003e\n\u003c/div\u003e","showPrivacyOptOutMessage":false},{"providerName":"facebook","providerNamePassedToEvents":"Facebook","shareUrlFormat":"//facebook.com/sharer/sharer.php?u={0}","id":"6d176960-1afd-4a34-83b5-795429359551","allowedForAnonymousUsers":true,"type":"Social","displayName":"Facebook","toggleDisplayName":"","namePassedToEvents":"Facebook","cssClassName":"atButtonFacebook","privacyOptOutMessage":"\u003cdiv class=\u0027privacyMessage\u0027\u003e\n\u003ch3\u003eThis feature is not available with your current cookie settings.\u003c/h3\u003e\n\u003cp\u003eYou can \u003ca href=\u0027#\u0027 data-show-preference-center=\u00271\u0027\u003eupdate your privacy settings\u003c/a\u003e to enable this content. Please enable “Functional Cookies” to use this feature.\u003c/p\u003e\n\u003c/div\u003e","showPrivacyOptOutMessage":false},{"templateId":"eb460499-2547-4f84-a197-60f31934a3b9","dialogHeading":"Email Article","emailCode":"PB_ContentEmail","dialogSettings":{"cancelButtonText":"Cancel","copyToSenderLabel":"Send a copy to myself","emailAddressesLabel":"* Email Address","emailInstructionText":"Separate email addresses with commas","fromText":"From:","privacyPolicyText":"\u003cp\u003e\u0026copy;2025 General Mills, Inc. All Rights Reserved. This information will only be used to send an email to your friend(s) and will not be saved. Please read our \u003ca rel=\u0022noopener noreferrer\u0022 rel=\u0022noopener noreferrer\u0022 href=\u0022http://www.generalmills.com/company/privacy-policies/privacy-policy-us\u0022 target=\u0022_blank\u0022 shape=\u0022rect\u0022\u003ePrivacy Policy\u003c/a\u003e.\u003c/p\u003e","requiredFieldText":"* Required","sendButtonText":"Send","senderEmailAddressLabel":"* Your Email Address","senderFirstNameLabel":"* Your First Name","sendToText":"Send To:"},"id":"2a5b12c8-299b-467d-812e-41e9a0afb70d","allowedForAnonymousUsers":true,"type":"Email","displayName":"Email","toggleDisplayName":"","namePassedToEvents":"Email","cssClassName":"atButtonEmail","privacyOptOutMessage":"\u003cdiv class=\u0027privacyMessage\u0027\u003e\n\u003ch3\u003eThis feature is not available with your current cookie settings.\u003c/h3\u003e\n\u003cp\u003eYou can \u003ca href=\u0027#\u0027 data-show-preference-center=\u00271\u0027\u003eupdate your privacy settings\u003c/a\u003e to enable this content. Please enable “Functional Cookies” to use this feature.\u003c/p\u003e\n\u003c/div\u003e","showPrivacyOptOutMessage":false},{"layoutParameter":"p%3d1","id":"783fefb5-010a-4be1-b84d-f0447da7c52c","allowedForAnonymousUsers":true,"type":"Print","displayName":"Print","toggleDisplayName":"","namePassedToEvents":"Print","cssClassName":"atButtonPrint","privacyOptOutMessage":"\u003cdiv class=\u0027privacyMessage\u0027\u003e\n\u003ch3\u003eThis feature is not available with your current cookie settings.\u003c/h3\u003e\n\u003cp\u003eYou can \u003ca href=\u0027#\u0027 data-show-preference-center=\u00271\u0027\u003eupdate your privacy settings\u003c/a\u003e to enable this content. Please enable “Functional Cookies” to use this feature.\u003c/p\u003e\n\u003c/div\u003e","showPrivacyOptOutMessage":false}],"isSticky":true},"userSettings":{"isCurrentUserAnonymous":true,"isFavoriteItem":false,"isAnonymousUserWithFavorites":false},"pageAttributes":{"url":"https%3a%2f%2fwww.pillsbury.com%2feveryday-eats%2fdinner-tonight%2fhow-to-use-an-instant-pot","contentId":"85c1a734-5429-4975-8674-5feefa134d02"},"recaptchaPublicKey":"6LceAigUAAAAAC8aIQvJ9yRpRl3r1ZBKbou-tIDe"};
var moduleName = 'actionToolbar';
var isVueModule = true;
GeneralMills.PandoSites.RegisterControlInstance(moduleName, configuration, componentMetadata, isVueModule)
});
})();
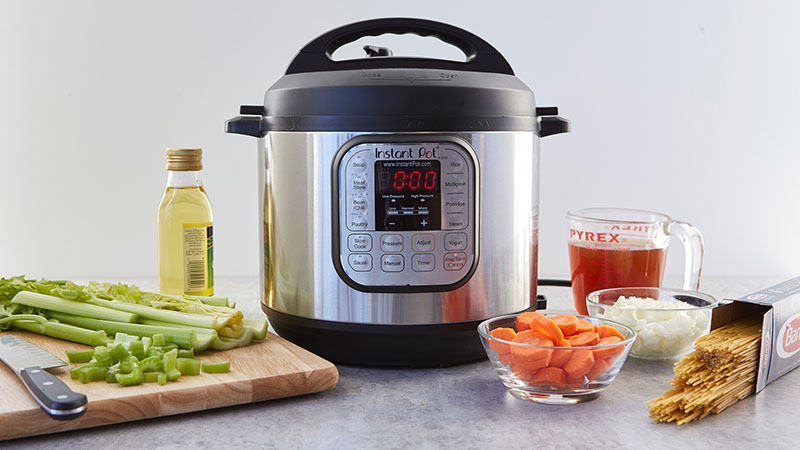
If you’re new to the Instant Pot® or even a newbie in the kitchen, brace yourself: This tool is a total game changer. The multicooker, no matter what model you have, will forever change the way you cook your favorite recipes. Here’s everything you need to know to master your new secret weapon in the kitchen.
What Is an Instant Pot®?
If you’re unfamiliar with this genius kitchen tool, you’re not alone—many people either have misconceptions about what an Instant Pot® is or are intimidated by how to use it. The Instant Pot® is a multi-use, programmable cooker that features the functions and capabilities of other kitchen tools like a pressure cooker, slow cooker, rice/porridge cooker, cake maker, yogurt maker, steamer, warmer and sterilizer. It also has sautéing and searing capabilities.
Of course, the various capabilities and features differ by model type. The Instant Pot® is available as small as three quarts and as large as eight. The Lux® series has three different 6-in-1 models within it varying in size from three to eight quarts. The Duo® series features 7-in-1 models. Most notably, it has the yogurt making function. The Duo Plus® and Ultra® feature 9-in-1 and 10-in-1 capabilities, respectively. And the Smart WiFi Instant Pot® is Bluetooth®-enabled so you can run and monitor cooking from your smart phone or tablet.
We’ll walk you through the basic individual functions so you can learn how to get the most out of your new appliance.
Functions of an Instant Pot®
Pressure Cooker
Arguably the most popular function of the Instant Pot®, a pressure cooker is an appliance that boils liquid inside a sealed pot. This causes the internal pressure and temperature to increase, cooking foods very quickly. It’s a popular device for cooking meats like pork shoulder that would otherwise take all day to cook.
Slow Cooker
The Instant Pot® also has a slow cooker function. If you’re not familiar with the slow cooker, it’s an electric appliance that simmers food at a low temperature so that you can leave it plugged in and unattended for hours. It’s useful for busy people who don’t have time to stand over the stove or wait around for the oven. The slow cooker can make a variety of dishes including (but not limited to) soups, pork chops, pot roast, chicken and even some desserts like cakes and cobblers.
Rice and Beans
You can cook both beans and rice in the Instant Pot®, too. This is especially beneficial if you're making these foods for a big potluck crowd. Plus, it eliminates the need to soak the beans or stand over the stove waiting for water to boil. For rice, check out our full how-to article on How to Cook Rice in an Instant Pot®!
Yogurt
Yes, even some models of the Instant Pot® can make homemade yogurt! The user manual for models that have the yogurt function has instructions for how to make yogurt, starting with milk. There is a specific “YOGURT” button on the Instant Pot® that you will use.
Steam
You can also use your Instant Pot® as a steamer. Normally, to steam foods such as broccoli or other vegetables, you would need a stove, a steamer basket and a pot. The Instant Pot® eliminates the need for those items, making steaming your veggies super easy!
Sauteing and Searing
Need to sear or cook meat before cooking it in the pressure cooker or slow cooker? You don’t even need to turn on the stove. The Instant Pot® can do it for you!
Warming
If you need to keep your food warm at a party or family dinner, you can also use the warming function with some models of the Instant Pot®.
As we mentioned above, some newer models of the Instant Pot® even have a cake making function. This is meant for really moist cakes like cheesecake or even certain banana bread recipes. Instant Pot® is constantly making updates to their products and adding innovative functions, so check their website to see which product is the right one for your cooking and baking needs.
How To Use an Instant Pot®
First and foremost, before you use your Instant Pot® for the first time, make sure you take the time to read the user manual to familiarize yourself with the parts and how it operates. You may also want to see the section titled “Instant Pot® Water Test” before you begin. The water test will demonstrate how the pressure works. Once you’ve done that, be sure to read your recipe from start to finish before you start cooking.
Instant Pot® Parts and Accessories
Knowing the parts of your Instant Pot® is essential to understanding how your new device works. Read the user manual before assembling or using your Instant Pot®. Different models have different capabilities and accessories, but most, if not all, include the main unit, a stainless steel cooking pot, a steamer rack, a sealing ring, glass lid, the lid to the main unit with a pressure and steam valve and a condensation collector.
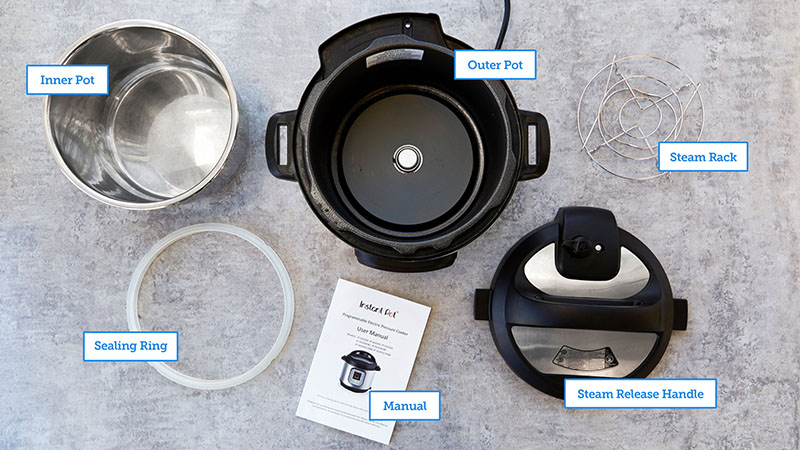
Sealing Ring
This is the silicone ring that helps seal steam inside of the pot. The sealing ring is replaceable—if yours tears or breaks, you can buy a new one on the Instant Pot® website or other sites like Amazon. It can be removed for easy cleanup, too and can even be washed in the dishwasher!
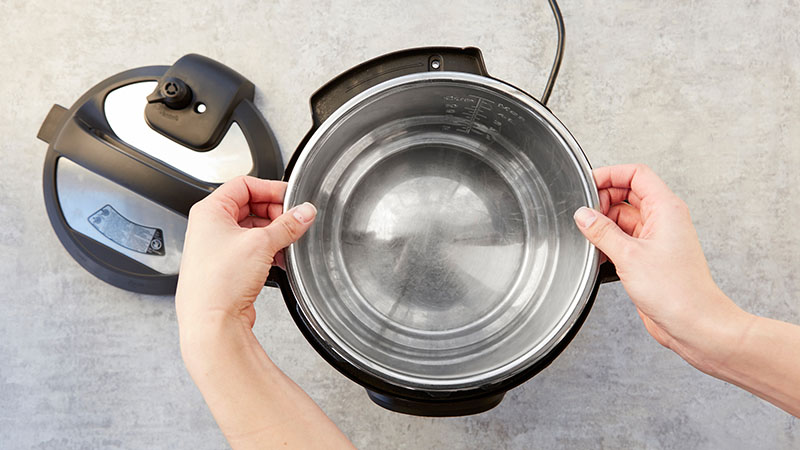
Inner Pot
The inner pot is the part of the Instant Pot® that you cook the food in, and it’s removable, which makes for easy cleaning!
Outer Pot
This is the outer part of the Instant Pot®. It’s the part of the Instant Pot® that heats up and hosts the control pad on the outside. The inner pot is placed inside—don’t cook anything in the Instant Pot® without inserting the inner cooking pot first!
Steam Rack
The steam rack can be placed directly into the pot for when recipes call for the food not to be completely submerged in liquid.
Steam Release Handle
The steam release handle controls whether the Instant Pot® releases steam naturally (which means you don’t have to do anything) or the manual, quick-pressure release, which the user flips to quickly stop the cooking process.
Manual
We mentioned this before, and we’ll say it again: Make sure you read your Instant Pot® manual before your start cooking. The Instant Pot® is an awesome device, but at times not completely intuitive. It may take some practice to get the hang of things! But if you’re armed with the manual and this article, you are well on your way to becoming a pro.
Extras
There are additional optional accessories that you can purchase as you begin to get comfortable with your appliance. The inner cooking pot that comes with the Instant Pot® can be swapped out for a non-stick ceramic pot that’s easy to clean. If you’re using your Instant Pot® regularly, it’s beneficial to have two inner pots to use. It’s also a good idea to purchase an extra sealing ring or two as this particular part tends to absorb odors and needs frequent washing.
Another popular item that helps with Instant Pot® cooking is a glass lid that fits over the inner pot. The glass lid will allow you to see what’s happening when you use the “Saute,” “Keep Warm” or “Slow Cooker” functions.
The items mentioned above are the most popular accessories, but you can also purchase novelty items like a steam rack with handles, yogurt cups, cake pans and loaf pans.
Manual vs. Natural Release
There are two techniques to release pressure in your Instant Pot® when the cooking time is over. The natural release will slowly release pressure without you having to do anything. The natural release causes less friction and motion in the pot and is good for cooking foods with a high liquid or starch content, like soup. The process can take anywhere from five to 10 minutes.
Alternatively, the manual release, also called quick pressure release, will release pressure in one to two minutes which quickly stops the cooking process. This is useful for quick-cooking foods like vegetables or tender seafood. To trigger the manual release, you will turn the switch located on the top of the appliance from sealing to venting.
When you manually flip the switch, steam will rapidly exit the appliance so do not stand over your pot and keep your face away from the steam. You can also flip the switch using a wooden spoon so you can keep your distance. When the pressure is released, the floating valve will drop and you will be able to open the lid. The floating valve is the silver dot located to the right of the switch. The lid will not open until the pressure is fully released.
Instant Pot® Water Test
So you just took your Instant Pot® out of the box and you can’t wait to put it to good use—we don’t blame you! But before you start experimenting with your favorite recipes, you should conduct what’s called an Instant Pot® water test so you can familiarize yourself with how the pressure works.
Step 1: First, place the pot inside of the heating element making sure that nothing is in between the two.
Step 2: Next, pour three cups of water in the pot and close and lock the lid.
Step 3: Press the “Steam” button on the front of the Instant Pot® and set the pressure level to 2. The device will beep once it is ready. If you want the Instant Pot® to release pressure naturally, simply wait until the valve drops down. If you’d like to use the quick-release function, flip the switch from sealing to venting until the valve drops.
What to Cook in an Instant Pot®
Similar to your slow cooker, there are endless possibilities of what you can cook in your Instant Pot® because there are quite a few functions within the device. The major benefit is that you can speed up the cooking process and have dinner ready in, well, an instant. But you can also use the slow cooker function, the steam or saute function or with some models, the rice and yogurt function.
The electric pressure cooker is the key function that can accelerate cooking time and it’s likely the function you’ll use most often.
Meats like poultry, beef and pork work well as does braised meat or tougher cuts of meat. Beans, potatoes and vegetables also work well since they can be steamed, braised or stewed. Soup is also an excellent candidate for your multicooker, whether you choose to use the pressure cooker for a quick soup or the slow cooker for a set-it-and-forget it soup.
As functional and diverse as the multicooker is, there are a few foods that do not do well and should be left to other cooking methods. Foods that have a crispy or browned exterior, meats that you prefer to eat rare and easily overcooked seafood. Then there are foods that you could cook in the Instant Pot®, but there really isn’t a benefit to doing so versus the alternative. Foods like, cakes (unless it’s a custard-based dessert or cheesecake!) and some sauteed vegetables are better off being cooked in the oven or the stove since it doesn’t save you any time to make them in your multicooker.
Instant Pot® Recipes
If you’re wondering where to start or what to cook in an Instant Pot®, give this super easy recipe a try first. It’s a quick version of spaghetti Bolognese!
What you need:
- 1 6-quart Instant Pot® (we used the Instant Pot® DUO 7-in-1)
- Large mixing spoon
- Tongs
Ingredients:
- 1 tablespoon olive oil
- 1 lb extra-lean (at least 90%) ground beef
- 2 cups chopped yellow onions
- ½ teaspoon salt
- 1 cup chopped celery
- 1 cup chopped peeled carrots
- 2 cups Progresso beef broth (from 32-oz carton)
- 12 oz uncooked spaghetti, broken in half
- 1 can (28 oz) Muir Glen organic fire-roasted crushed tomatoes, undrained
Step 1: On a 6-quart Instant Pot®, press SAUTE and adjust to normal. Heat the oil in the insert. Add the beef, onions and salt. Cook for 8 to 10 minutes, stirring occasionally, until thoroughly cooked. Next, stir in the chopped celery and carrots. Press CANCEL.
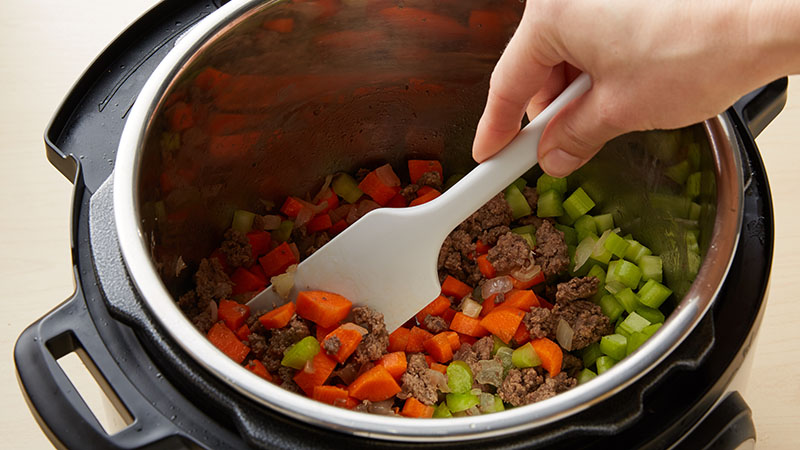
Step 2: Pour the beef broth into the beef mixture.
Step 3: Next, add the spaghetti noodles evenly over the beef mixture. Then, spread the tomatoes evenly over the spaghetti (spreading the tomatoes over the noodles will help the pasta cook evenly once it’s under pressure). Secure the lid and set the pressure valve to SEALING. On the Instant Pot®, select MANUAL and cook on high pressure for 7 minutes. After the 7 minutes, press CANCEL and set the pressure valve to VENTING to quick-release the pressure.
Step 4: Using the tongs, immediately lift and stir the mixture for 1 to 2 minutes or until the pasta has completely separated—the spaghetti may appear to be stuck together at first, but it will separate once you give it a stir!
Step 5: Serve this dish with some shredded Parmesan cheese and fresh basil for a pretty (and delicious) finish!
Ready to try some more Instant Pot® recipes? We have a whole bunch of kitchen-tested recipes for you to choose from.
How to Convert Recipes to an Instant Pot®
While most recipes work well in an Instant Pot®, there are some worth avoiding—such as fried foods (like fried chicken), homemade jams or preserves, bread and stir fries—since the Instant Pot® won’t give you the best results. But if you’re craving your favorite soups or stews, meats or beans, grain-based or slow-cooker dishes made Instant Pot®-style, here are a few basic tips on how to convert standard recipes to the multicooker.
Reduce Cooking Time and Liquid
Since the Instant Pot® cooks most foods much faster than traditional cooking methods, you’ll need to reduce the overall cooking time for your standard recipe. Our best practice is to try to find a kitchen-tested Instant Pot® recipe that’s similar to the recipe you’re trying to convert and use it as a guide. Otherwise, if you’re using a meat recipe that usually requires an oven, you can lower the cook time by one-third to two-thirds.
Because the Instant Pot® cooks foods faster and also has a sealed lid, there is little to no evaporation during cooking, unlike traditional cooking methods on the stove or in the oven. When making soups or stews, err on the side of less liquid than more—keeping in mind that you’ll need at least 1 cup of liquid in the pot before turning it on to create the steam needed for cooking (and to avoid burning).
Don’t Underfill or Overfill
Since your Instant Pot® needs room to build pressure to cook the food, don’t overfill it with ingredients. You also don’t want to underfill it, which will cause overcooking or burning. Our rule of thumb is to fill the pot two-thirds for most recipes, and only halfway for grains, pastas or beans (as they expand and grow while cooking). In all cases, never add ingredients past the MAX fill line in the pot.
Quick Release vs. Natural Release
The Instant Pot® gives two options for releasing pressure: quick pressure release and natural release. While the natural release can be used for most recipes (which will continue to cook the ingredients inside as the pressure releases), if you’re cooking something you don’t want to overcook—such as vegetables or pasta—the quick pressure release is the better choice.
How to Clean an Instant Pot®
Proper cleanup and regular maintenance is the key to any long lasting appliance and your Instant Pot® is no different. Before you give your Instant Pot® a wipe down or a thorough cleaning, make sure that it is unplugged from the electrical outlet. Then remove the lid and inner pot from the main unit; using a damp cloth, wipe down the exterior of the appliance to remove any residue. Remember, the main unit of your Instant Pot® has electrical parts in it so you should never submerge it in water or put it in the dishwasher.
Once you’ve wiped down the exterior of the appliance, use a small brush or Q-tip to get in any crevices where food debris may be hiding. Then you can move on to washing the lid with warm, soapy water. You don’t have to do this every time—usually you can just wipe down the lid with a dry cloth since it will likely only have condensation on it.
To wash the inner pot and steam rack, you can also do this with warm, soapy water. Both of these parts can be washed in the dishwasher as well.
Those steps should be taken each time you use your Instant Pot®, but you should also conduct a more thorough cleaning and inspection regularly to ensure the longevity and efficiency of your appliance. Periodically, you should remove the steam-release handle (not the steam valve—the steam valve should not be removed), the anti-block shield, the float valve and the sealing ring. Check for food debris, wipe down the individual parts and securely reattach the pieces to the appliance.
Be sure to inspect each part on a regular basis, especially the silicone sealing ring. The sealing ring is an important safety measure during pressure cooking so you should inspect to make sure there isn’t any cracking or leaking. The sealing ring can also be put into the dishwasher but be sure to place it on the top rack if you choose to do so.
If any of your Instant Pot® parts become unusable, the Instant Pot® website has an online store where you can order replacement parts individually.
FAQs
When using the pressure cooker function, how long does it take for the Instant Pot® to get up to pressure?
Though it may take pork chops only a few minutes to actually cook in the pressure cooker, you need to remember that the Instant Pot® needs time to get up to pressure depending on what dish you’re making, and time to come down before you can open the lid. It can take a few minutes or more for the Instant Pot® to pressurize. It can take between 10 and 30 minutes for the Instant Pot® to come down naturally, and it’s usually under two minutes using manual release.
Can I use recipes for stovetop pressure cookers for the Instant Pot®, too?
Instant Pots ®and traditional pressure cookers have a different PSI (amount of pressure) for high and low, so Instant Pot® and traditional stovetop pressure-cooking recipes are not interchangeable.
Is the Instant Pot® safe to use?
The Instant Pot® has a number of features that make it safer to use than older stovetop pressure cooker models. The anti-block shield keeps liquids from shooting out the top of the lid when releasing pressure manually. Just make sure you check and clean it after cooking to make sure it’s not blocked. The lid locking pin also locks to prevent you from opening the pot under pressure.
Can I use recipes for the Instant Pot® for other multicookers produced by other brands?
We exclusively tested our recipes using 6-quart Instant Pot® products, and would not recommend using these recipes for other countertop multicookers made by different brands. These products are constantly evolving, and results could vary.
(function() {
document.addEventListener('DOMContentLoaded', function() {
var componentMetadata = JSON.parse('\x7b\x22componentName\x22\x3a\x22NewsletterCTA_592b7e30-5c94-49d6-8316-3c4546d1dac2\x22,\x22deferOptions\x22\x3a\x7b\x22deferComponent\x22\x3atrue,\x22deferType\x22\x3a\x22OnDemand\x22,\x22deferId\x22\x3a\x22r3169b551c7224f0da8ab699e9d100482\x22,\x22deferredContainerId\x22\x3a\x22\x2fprimaryColumn\x2finteropInlineNewsletterCta\x22,\x22deferredContainerView\x22\x3a\x22InteropDeferWrapper\x22\x7d,\x22viewName\x22\x3a\x22NewsletterCTA\x22\x7d');
var configuration = {"unsubscribedNewsletters":[{"listId":"6d3e858f-4804-4f38-9b8a-712a9a5668cc","thumbnailImageUrl":"/-/media/GMI/Core-Sites/PB/Images/Shared/myaccount/newsletters/PB_Email_Thumb_200x200.gif?sc_lang=en","previewUrl":"https://morpheus3.idpk.net/email_sends/10626/preview","name":"Pillsbury\u0027s Email","isPromo":false}],"settings":{"anonymousCopy":"Family-friendly meals made easy!","anonymousDescriptionCopy":"Make everyday family moments count, with easy recipes that everyone will love. Join our email community to receive tested recipes and tips.","anonymousThankYouCopy":"Thanks! Your first email is on its way.","anonymousThankYouDescriptionCopy":"\u003cp\u003e\u003cspan\u003eNow that you\u0026rsquo;re signed up, create an account on Pillsbury.com to save your favorite recipes, learn more about special promotions and get meal inspiration for any occasion.\u003c/span\u003e\u003c/p\u003e","anonymousButtonText":"Help me make mealtimes easier!","anonymousEmailInvalidErrorText":"Please enter a valid email address.","anonymousSubscribeErrorText":"We encountered an error while signing you up. Please try again.","anonymousEmailAddressPlaceholderText":"Enter your email address","anonymousEmailAddressLabel":"Email Address","anonymousLegalCopy":"By signing up, you accept our\u0026nbsp;\u003cspan style=\u0022text-decoration: underline;\u0022\u003e\u003ca rel=\u0022noopener noreferrer\u0022 href=\u0022https://www.generalmills.com/privacy-security/us-english-privacy-policy\u0022 target=\u0022_blank\u0022\u003ePrivacy Policy\u003c/a\u003e\u003c/span\u003e\u0026nbsp;and agree that your information may be used across our\u0026nbsp;\u003cspan style=\u0022text-decoration: underline;\u0022\u003e\u003ca rel=\u0022noopener noreferrer\u0022 href=\u0022https://www.generalmills.com/food-we-make/brands\u0022 target=\u0022_blank\u0022\u003efamily of brands\u003c/a\u003e.\u003c/span\u003e","requiredFieldText":"","backgroundColor":"#002E6D","accentColor":"","registrationUrl":"/user-profile/register?RegAction=SUBSCRIBERUPGRADE\u0026esrc=14171\u0026returnUrl=%2feveryday-eats%2fdinner-tonight%2fhow-to-use-an-instant-pot","registrationLinkText":"Sign up now","enableExpandedFields":false,"hideForSessionCookieExpiration":0,"ctaType":"StandardAnonymous","location":"Inline","userState":"Anonymous","sourceCodeOverride":0}};
var moduleName = 'newsletterCta';
var isVueModule = true;
GeneralMills.PandoSites.RegisterControlInstance(moduleName, configuration, componentMetadata, isVueModule)
});
})();