Recipe Ingredients
Chicken: This recipe is a great way to use leftover chicken or turkey, whether it's breast, thigh, or a mix of both. If you don’t have leftovers, rotisserie chicken is an easy alternative to help you get your pot pie into the oven quickly.
Milk: We tested this recipe with 2% milk, but you can use any type you have on hand. The higher the fat content, the richer the flavor of the sauce. Some fans prefer heavy whipping cream for a richer flavor and slightly thicker sauce.
Pie Crust: We love using our highly-rated Pillsbury Pie Crusts to make it simple. Or go to our Scratch Pie Crust How To if you want a homemade option.
Vegetables: Thaw frozen veggies quickly by placing in a strainer and running under cool water to slash prep time.
Chicken Broth: Use 1 3/4 cups from a 32-ounce carton. You can use bouillon paste and water—but if you do, reduce the amount of salt to 1/4 teaspoon. This will help you to avoid it being over salted.
Flour: The starch granules in flour expand when cooked with liquid to create a thickened sauce mixture.
Butter: Contributes dairy flavor and acts to separate the flour starch granules for a smooth sauce.
Onion: Plays a supporting flavor role. You can also use chopped shallots or green onions, instead.
Cookware You'll Need
Pie Plate: We’ve tested making pies in every type of material, and a heat-resistant glass pie plate will help your crust brown the best and have the flakiest texture. Another option is a ceramic pie dish, because it acts similarly to glass.
2-Quart Saucepan: A 2-quart saucepan is the right size for this recipe for the perfect sauce consistency. A smaller pan won’t allow much evaporation, so the sauce will be thinner, whereas using a larger pan will result in more evaporation, resulting in a thick sauce.
Whisk: Use a whisk when gradually stirring in the broth and milk. It will quickly remove any lumps to make a lovely, smooth sauce.
Aluminum Foil: Use aluminum foil to shield the edge of the pot pie towards the end of the baking time to prevent it from getting overly brown.
How to Make Chicken Pot Pie
1. Prepare the Pie Crusts
Soften your pie crusts by leaving them on the counter for 15 minutes. Straight from the fridge they could crack. If left too long they could become sticky and hard to use. Unroll soften crusts and press 1 crust firmly to bottom and sides of pie plate.
2. Make the Filling
Cook onion in melted butter before adding flour and seasonings. Then use a whisk to gradually add the broth and milk for a lump-free sauce. Finish by mixing in cooked chicken and veggies.
3. Fill and Seal
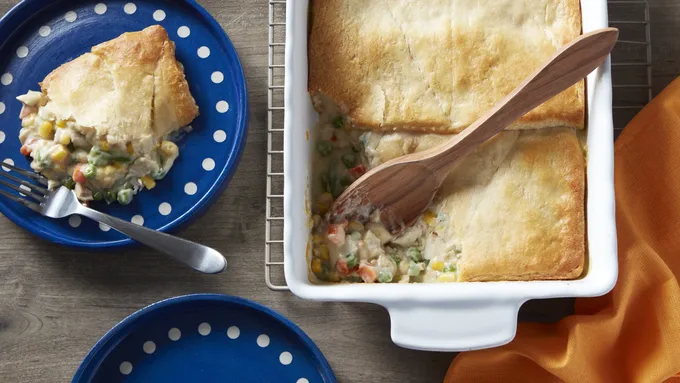
Spoon the filling into the bottom crust; top with the second crust. Flute your pie by folding the top crust edge under the bottom crust edge to create a thick raised edge. Then pinch the raised edge between your thumb and forefinger, creating a scalloped pattern. Don’t forget to slit the top crust to allow steam to escape.
4. Bake and Cover
Bake the pie uncovered for the first 15 minutes, so the crust can take on some color. Then cover the edge with foil so the center can continue to brown without the pie crust edge getting too dark.
Possible Variations
We’ve heard from you that you like to experiment with this recipe. Try any of these tasty variations:
Vary Veggies: Substitute any 2 cups of thawed frozen, bite-sized veggies. We’ve heard you like to add seasonal veggies, too. Plain veggies without sauce or seasoning work best; try broccoli, cauliflower, peas, or stir-fry combinations.
Add Herbs: Our experts swear that adding 1/2 teaspoon dried thyme leaves takes this chicken pot pie up a notch. Add 1/2 teaspoon of Italian seasoning, dried basil, or oregano leaves. For fresh herbs, use 1 teaspoon.
Change Protein: During Thanksgiving, we love using Thanksgiving leftovers in our Turkey Pot Pie recipe. We also love using used cubed ham, or a 12-oz can of tuna in water instead of chicken.
If you’re as crazy for pot pie as we are, check out our whole collection of tasty pot pie recipes.
Storage
We love leftovers! Just remember to store any leftovers within 2 hours of being served to prevent food-borne illness.
Refrigerator
Wrap the remaining pot pie with plastic wrap or store individual servings in resealable food-storage containers in the refrigerator for 3 to 4 days.
Freezer
Freezing this chicken pot pie is not recommended. The crust will absorb the moisture from the filling and end up too soggy when reheated. If you’re looking for a freezer friendly recipe, we recommend these mini chicken pot pies.
Reheating
Cover and microwave on Medium-High (70%) for 2 to 3 minutes or until the chicken filling reaches at least 165°F (use a food thermometer) in the center.
Why Pillsbury Users Love This Recipe
“This was a great, simple recipe,” says mntmomma. “My guys LOVED IT!!”
With over 2,400 reviews and counting, this recipe is a hit with a 5-star rating. Our users are excited about how simple and easy it is to put this tasty dinner recipe together, saying it’s even easy enough for beginners. They love that they can use both rotisserie chicken and frozen veggies—both common dinner shortcuts— in such a delicious recipe.
Our fans say this is even a winner for the entire family. Picky eaters who typically don’t like pot pies love this recipe. “My go to recipe when I have frozen roasted chicken in my freezer. My whole family loves it!!,” says DanaJ2024.
Frequently Asked Questions
How Can I Keep the Bottom Pie Crust from Becoming Soggy?
After making this recipe countless times for her family, one of our experts has these tips:
Use a Glass Pie Plate: Allows the heat to distribute ensuring a flaky bottom crust, even when it’s filled with pot pie filling.
Make, Bake and Serve the Pie: Don’t let the unbaked pie sit with the filling in it. The crust will soak up some of the moisture from the filling. Fill the crust with the filling, bake it, then serve it.
Can I Make This Chicken Pot Pie Ahead of Time?
For the flakiest pie crust, it’s best to bake and serve this pot pie right after making it. The filling contains a high proportion of liquid that will soak into the pie crust over time, causing it to become soggy.
Can I Make This with Only Top Crust?
Yes! Spray the pie plate with cooking spray before adding the filling. When finishing the top edge, press the edge of the crust to the pie plate to anchor, preventing the filling from bubbling over the edge and the crust from shrinking. This is a terrific way to make a lighter version of the recipe, and you’ll never have a soggy bottom crust! To serve a one crust pot pie, break through the top crust with a large serving spoon, scooping out the luscious filling with it, like you would with a casserole.
If I Only Have a Metal Pie Pan, Can I Use It?
If you have a dull aluminum pie pan, it’s almost as good as a glass or ceramic. It will absorb the heat from the oven, allowing the pie crust to brown and get flaky. If your pan is shiny metal or disposable foil, you can still use it, however, the heat is reflected while the pot pie bakes, making it harder to brown. This can lead to the bottom crust getting soggy from the filling.
(function() {
document.addEventListener('DOMContentLoaded', function() {
var componentMetadata = JSON.parse('\x7b\x22componentName\x22\x3a\x22RecipeFAQ_e8af84a8-5198-47ca-bc1c-daf22247ecf7\x22,\x22deferOptions\x22\x3a\x7b\x22deferComponent\x22\x3afalse,\x22deferType\x22\x3a\x22None\x22,\x22deferId\x22\x3a\x22r9967b9d8d8d9487187dd97cbc8466d85\x22,\x22deferredContainerId\x22\x3a\x22\x2fmain\x2frdpFAQ\x22,\x22deferredContainerView\x22\x3anull\x7d,\x22viewName\x22\x3a\x22RecipeFAQ\x22\x7d');
var configuration = {"title":"Classic Chicken Pot Pie","introduction":"\u003cp\u003eIf you asked us what the perfect comfort meal is, we’d have to say homemade chicken pot pie! This top-rated and viewed recipe on Pillsbury.com was originally developed in the Pillsbury Test Kitchens in 1999 for a pie booklet. It was also featured on our refrigerated Pillsbury pie crust box. This chicken pot pie recipe features leftover cooked chicken and frozen mixed veggies in a thick, buttery-rich sauce, all tucked inside flaky pie pastry. It’s a warm, satisfying dinner perfect for any meal of the week.\u003c/p\u003e\u003cp\u003eOver the years, we’ve perfected this recipe in a few ways. We’ve added a 1/4 cup more chicken broth and 3 tablespoons less milk for the best-tasting sauce. We also found that baking the pie in a glass pie plate ensures the flakiest crust. Our pro tip: cover the edge of the pie during the last portion of baking for a picture-perfect finish. You’ll find our updates over the years to this tried-and-true dish make it even simpler and scrumptious. This year-round classic is ideal for using up leftover chicken and will be ready to enjoy in about an hour!\u003c/p\u003e","servingSize":"1 Serving","image":{"small":{"media":"(min-width: 0px)","src":"https://mojo.generalmills.com/api/public/content/tKec_wnrtk-lTBFsG4Vi5A_webp_base.webp?v=e096bed7\u0026t=e724eca7b3c24a8aaa6e089ed9e611fd"},"medium":{"media":"(min-width: 500px)","src":"https://mojo.generalmills.com/api/public/content/tKec_wnrtk-lTBFsG4Vi5A_webp_base.webp?v=e096bed7\u0026t=191ddcab8d1c415fa10fa00a14351227"},"large":{"media":"(min-width: 767px)","src":"https://mojo.generalmills.com/api/public/content/tKec_wnrtk-lTBFsG4Vi5A_webp_base.webp?v=e096bed7\u0026t=191ddcab8d1c415fa10fa00a14351227"},"alt":"Classic Chicken Pot Pie"},"contributor":{"label":"By","name":"Pillsbury Kitchens","profileUrl":"/about-us","displayDate":{"label":"Updated","date":"Mar 10, 2025"}},"ingredientGroups":[{"name":"Crust","ingredients":[{"quantity":"1","description":"box (14.1 oz) refrigerated Pillsbury™ Pie Crusts (2 Count), softened as directed on box","productLink":"/products/pie-crust/refrigerated-pie-crust"}]},{"name":"Filling","ingredients":[{"quantity":"1/3","description":"cup butter or margarine"},{"quantity":"1/3","description":"cup chopped onion"},{"quantity":"1/3","description":"cup all-purpose flour"},{"quantity":"1/2","description":"teaspoon salt"},{"quantity":"1/4","description":"teaspoon pepper"},{"quantity":"1 3/4","description":"cups from 1 carton Progresso™ Classic Chicken Broth"},{"quantity":"1/2","description":"cup milk"},{"quantity":"2 1/2","description":"cups shredded cooked chicken or turkey"},{"quantity":"2","description":"cups frozen mixed vegetables, thawed"}]}],"steps":[{"description":"\u003cp\u003eBring crusts to room temperature by removing outer package and placing on your counter for 15 minutes. Heat oven to 425°F.\u003c/p\u003e"},{"description":"\u003cp\u003ePlace 1 pie crust in ungreased 9-inch glass pie plate. Press crust firmly against side and bottom, allowing any extra crust to hang over the edge.\u003c/p\u003e"},{"description":"\u003cp\u003eIn 2-quart saucepan, melt butter over medium heat. Add onion; cook 2 minutes, stirring frequently, until tender.\u0026nbsp;\u003c/p\u003e"},{"description":"\u003cp\u003eStir in flour, salt, and pepper until well blended.\u003c/p\u003e"},{"description":"\u003cp\u003eGradually stir in broth and milk, cooking and stirring until bubbly and thickened.\u003c/p\u003e","stepShotImageUrl":"//mojo.generalmills.com/api/public/content/hrZgujKHq0eGu5KJeWydCg_webp_base.webp?v=50709d8f\u0026t=51a43a57af4046789e5a7f20567b1195"},{"description":"\u003cp\u003eStir in chicken and mixed vegetables until thoroughly combined. Remove from heat.\u003c/p\u003e"},{"description":"\u003cp\u003eSpoon chicken mixture into crust-lined pie plate.\u003c/p\u003e"},{"description":"\u003cp\u003ePlace second crust over the chicken mixture. Fold excess top crust under the edge of the bottom crust, pressing edges together to seal and create a thick rim.\u003c/p\u003e"},{"description":"\u003cp\u003eFlute the edge of the pie crust by placing your thumb and index finger about 1 inch apart on the outside edge. With your other index finger, push the pastry toward the outside to form a scalloped edge.\u003c/p\u003e"},{"description":"\u003cp\u003eWith a small knife, cut slits or shapes in several places in top crust to allow steam to escape while baking.\u003c/p\u003e"},{"description":"\u003cp\u003eBake 15 minutes. Then cover edge of crust with foil to prevent excessive browning.\u003c/p\u003e","stepShotImageUrl":"//mojo.generalmills.com/api/public/content/f6gXioRghUSfzB0HIlnitg_webp_base.webp?v=96d766ee\u0026t=51a43a57af4046789e5a7f20567b1195"},{"description":"\u003cp\u003eBake an additional 15 to 25 minutes or until the top crust is golden brown and filling is at least 165°F. Let stand 5 minutes before serving.\u003c/p\u003e"}],"tips":[{"title":"","description":"Homemade chicken pot pie is the perfect comfort meal. This rich and creamy chicken pot pie is one of our top-rated recipes—ever. Give it a try!","category":"Rich Snippet"},{"title":"","description":"\u003cp\u003eMake a foil collar (or pie crust shield) to protect the edges of the pastry from overbrowning. Cut a circle big enough from a large piece of foil to expose only the center of the pie. Or cut a piece of foil long enough to go completely around the pie plate. With either crust shield, gently wrap the foil over the pie crust edge about halfway through the baking time.\u003c/p\u003e","category":"Method Note"},{"title":"","description":"A standard 9-inch glass pie plate works best for this recipe.","category":"Recipe/Ingredient Facts"},{"title":"","description":"Recipe meets Kitchen Tested criteria. Reviewed as part of project MSO-5941 BC Audit 200 recipes","category":"Kitchen Tested"}],"kitchenTips":[{"title":"","description":"\u003cp\u003eMake a foil collar (or pie crust shield) to protect the edges of the pastry from overbrowning. Cut a circle big enough from a large piece of foil to expose only the center of the pie. Or cut a piece of foil long enough to go completely around the pie plate. With either crust shield, gently wrap the foil over the pie crust edge about halfway through the baking time.\u003c/p\u003e","category":"Method Note"},{"title":"","description":"A standard 9-inch glass pie plate works best for this recipe.","category":"Recipe/Ingredient Facts"}],"additionalContent":[{"title":"Recipe Ingredients","description":"\u003cp\u003e\u003cstrong\u003eChicken:\u003c/strong\u003e This recipe is a great way to use leftover chicken or turkey, whether it\u0027s breast, thigh, or a mix of both. If you don’t have leftovers, rotisserie chicken is an easy alternative to help you get your pot pie into the oven quickly.\u003c/p\u003e\u003cp\u003e\u003cstrong\u003eMilk\u003c/strong\u003e: We tested this recipe with 2% milk, but you can use any type you have on hand. The higher the fat content, the richer the flavor of the sauce. Some fans prefer heavy whipping cream for a richer flavor and slightly thicker sauce.\u003c/p\u003e\u003cp\u003e\u003cstrong\u003ePie Crust:\u003c/strong\u003e We love using our highly-rated \u003ca href=\u0022https://www.pillsbury.com/products/pie-crust/refrigerated-pie-crust\u0022\u003ePillsbury Pie Crusts\u003c/a\u003e to make it simple. Or go to our \u003ca href=\u0022https://www.pillsbury.com/everyday-eats/desserts/pies-tarts/how-to-make-pie-crust-from-scratch\u0022\u003eScratch Pie Crust How To\u003c/a\u003e if you want a homemade option.\u003c/p\u003e\u003cp\u003e\u003cstrong\u003eVegetables: \u003c/strong\u003eThaw frozen veggies quickly by placing in a strainer and running under cool water to slash prep time.\u003c/p\u003e\u003cp\u003e\u003cstrong\u003eChicken Broth:\u003c/strong\u003e Use 1 3/4 cups from a 32-ounce carton. You can use bouillon paste and water—but if you do, reduce the amount of salt to 1/4 teaspoon. This will help you to avoid it being over salted.\u003c/p\u003e\u003cp\u003e\u003cstrong\u003eFlour:\u003c/strong\u003e The starch granules in flour expand when cooked with liquid to create a thickened sauce mixture.\u003c/p\u003e\u003cp\u003e\u003cstrong\u003eButter:\u003c/strong\u003e Contributes dairy flavor and acts to separate the flour starch granules for a smooth sauce.\u0026nbsp;\u0026nbsp;\u003c/p\u003e\u003cp\u003e\u003cstrong\u003eOnion:\u003c/strong\u003e Plays a supporting flavor role. You can also use chopped shallots or green onions, instead.\u003c/p\u003e","category":"SEO Content_1"},{"title":"Cookware You\u0027ll Need","description":"\u003cp\u003e\u003cstrong\u003ePie Plate: \u003c/strong\u003eWe’ve tested making pies in every type of material, and a heat-resistant glass pie plate will help your crust brown the best and have the flakiest texture. Another option is a ceramic pie dish, because it acts similarly to glass.\u003c/p\u003e\u003cp\u003e\u003cstrong\u003e2-Quart Saucepan: \u003c/strong\u003eA 2-quart saucepan is the right size for this recipe for the perfect sauce consistency. A smaller pan won’t allow much evaporation, so the sauce will be thinner, whereas using a larger pan will result in more evaporation, resulting in a thick sauce.\u003c/p\u003e\u003cp\u003e\u003cstrong\u003eWhisk:\u003c/strong\u003e Use a whisk when gradually stirring in the broth and milk. It will quickly remove any lumps to make a lovely, smooth sauce.\u003c/p\u003e\u003cp\u003e\u003cstrong\u003eAluminum Foil:\u003c/strong\u003e Use aluminum foil to shield the edge of the pot pie towards the end of the baking time to prevent it from getting overly brown.\u003c/p\u003e","category":"SEO Content_2"},{"title":"How to Make Chicken Pot Pie","description":"\u003ch3\u003e\u003cstrong\u003e1. Prepare the Pie Crusts\u0026nbsp;\u003c/strong\u003e\u003c/h3\u003e\u003cp\u003eSoften your pie crusts by leaving them on the counter for 15 minutes. Straight from the fridge they could crack. If left too long they could become sticky and hard to use. Unroll soften crusts and press 1 crust firmly to bottom and sides of pie plate.\u003c/p\u003e\u003ch3\u003e\u003cstrong\u003e2. Make the Filling\u0026nbsp;\u003c/strong\u003e\u003c/h3\u003e\u003cp\u003eCook onion in melted butter before adding flour and seasonings. Then use a whisk to gradually add the broth and milk for a lump-free sauce. Finish by mixing in cooked chicken and veggies.\u003c/p\u003e\u003ch3\u003e\u003cstrong\u003e3. Fill and Seal\u003c/strong\u003e\u003c/h3\u003e\u003cp\u003eSpoon the filling into the bottom crust; top with the second crust. Flute your pie by folding the top crust edge under the bottom crust edge to create a thick raised edge. Then pinch the raised edge between your thumb and forefinger, creating a scalloped pattern. Don’t forget to slit the top crust to allow steam to escape.\u003c/p\u003e\u003ch3\u003e\u003cstrong\u003e4. Bake and Cover\u003c/strong\u003e\u003c/h3\u003e\u003cp\u003eBake the pie uncovered for the first 15 minutes, so the crust can take on some color. Then cover the edge with foil so the center can continue to brown without the pie crust edge getting too dark.\u0026nbsp; \u0026nbsp;\u003c/p\u003e","category":"SEO Content_3"},{"title":"Possible Variations","description":"\u003cp\u003eWe’ve heard from you that you like to experiment with this recipe. Try any of these tasty variations:\u003c/p\u003e\u003cp\u003e\u003cstrong\u003eVary Veggies\u003c/strong\u003e: Substitute any 2 cups of thawed frozen, bite-sized veggies. We’ve heard you like to add seasonal veggies, too. Plain veggies without sauce or seasoning work best; try broccoli, cauliflower, peas, or stir-fry combinations.\u003c/p\u003e\u003cp\u003e\u003cstrong\u003eAdd Herbs:\u003c/strong\u003e Our experts swear that adding 1/2 teaspoon dried thyme leaves takes this chicken pot pie up a notch. Add 1/2 teaspoon of Italian seasoning, dried basil, or oregano leaves. For fresh herbs, use 1 teaspoon.\u003c/p\u003e\u003cp\u003e\u003cstrong\u003eChange Protein\u003c/strong\u003e: During Thanksgiving, we love using Thanksgiving leftovers in our \u003ca href=\u0022https://www.pillsbury.com/recipes/turkey-pot-pie/222c3cef-31cc-4936-abfd-cc72611c16c4\u0022\u003eTurkey Pot Pie recipe\u003c/a\u003e. We also love using used cubed ham, or a 12-oz can of tuna in water instead of chicken.\u003c/p\u003e\u003cp\u003eIf you’re as crazy for pot pie as we are, check out our whole collection of tasty \u003ca href=\u0022https://www.pillsbury.com/recipes/dish-type/pot-pies\u0022\u003epot pie recipes\u003c/a\u003e.\u003c/p\u003e","category":"SEO Content_4"},{"title":"Storage","description":"\u003cp\u003eWe love leftovers! Just remember to store any leftovers within 2 hours of being served to prevent food-borne illness.\u0026nbsp;\u003c/p\u003e\u003ch3\u003e\u003cstrong\u003eRefrigerator\u0026nbsp;\u003c/strong\u003e\u003c/h3\u003e\u003cp\u003eWrap the remaining pot pie with plastic wrap or store individual servings in resealable food-storage containers in the refrigerator for 3 to 4 days.\u003c/p\u003e\u003ch3\u003e\u003cstrong\u003eFreezer\u0026nbsp;\u003c/strong\u003e\u003c/h3\u003e\u003cp\u003eFreezing this chicken pot pie is not recommended. The crust will absorb the moisture from the filling and end up too soggy when reheated. If you’re looking for a freezer friendly recipe, we recommend these \u003ca href=\u0022https://www.pillsbury.com/recipes/freezer-friendly-mini-chicken-pot-pies/bdc95479-b046-4e1f-bca8-8047382edcc2\u0022\u003emini chicken pot pies\u003c/a\u003e.\u0026nbsp;\u003c/p\u003e\u003ch3\u003e\u003cstrong\u003eReheating\u003c/strong\u003e\u003c/h3\u003e\u003cp\u003eCover and microwave on Medium-High (70%) for 2 to 3 minutes or until the chicken filling reaches at least 165°F (use a food thermometer) in the center.\u003c/p\u003e","category":"SEO Content_5"},{"title":"Why Pillsbury Users Love This Recipe","description":"\u003cp\u003e“This was a great, simple recipe,” says mntmomma. “My guys LOVED IT!!”\u003c/p\u003e\u003cp\u003eWith over 2,400 reviews and counting, this recipe is a hit with a 5-star rating. Our users are excited about how simple and easy it is to put this tasty dinner recipe together, saying it’s even easy enough for beginners. They love that they can use both rotisserie chicken and frozen veggies—both common dinner shortcuts— in such a delicious recipe.\u003c/p\u003e\u003cp\u003eOur fans say this is even a winner for the entire family. Picky eaters who typically don’t like pot pies love this recipe. “My go to recipe when I have frozen roasted chicken in my freezer. My whole family loves it!!,” says DanaJ2024.\u003c/p\u003e","category":"SEO Content_6"}],"faq":[{"title":"How Can I Keep the Bottom Pie Crust from Becoming Soggy?","description":"\u003cp\u003eAfter making this recipe countless times for her family, one of our experts has these tips: \u0026nbsp;\u003c/p\u003e\u003cp\u003e\u003cstrong\u003eUse a Glass Pie Plate:\u003c/strong\u003e Allows the heat to distribute ensuring a flaky bottom crust, even when it’s filled with pot pie filling.\u003c/p\u003e\u003cp\u003e\u003cstrong\u003eMake, Bake and Serve the Pie:\u003c/strong\u003e Don’t let the unbaked pie sit with the filling in it. The crust will soak up some of the moisture from the filling. Fill the crust with the filling, bake it, then serve it.\u003c/p\u003e","category":"FAQ_1"},{"title":"Can I Make This Chicken Pot Pie Ahead of Time?","description":"\u003cp\u003eFor the flakiest pie crust, it’s best to bake and serve this pot pie right after making it. The filling contains a high proportion of liquid that will soak into the pie crust over time, causing it to become soggy.\u003c/p\u003e","category":"FAQ_2"},{"title":"Can I Make This with Only Top Crust?","description":"\u003cp\u003eYes! Spray the pie plate with cooking spray before adding the filling. When finishing the top edge, press the edge of the crust to the pie plate to anchor, preventing the filling from bubbling over the edge and the crust from shrinking. This is a terrific way to make a lighter version of the recipe, and you’ll never have a soggy bottom crust! To serve a one crust pot pie, break through the top crust with a large serving spoon, scooping out the luscious filling with it, like you would with a casserole.\u003c/p\u003e","category":"FAQ_3"},{"title":"If I Only Have a Metal Pie Pan, Can I Use It?","description":"\u003cp\u003eIf you have a dull aluminum pie pan, it’s almost as good as a glass or ceramic. It will absorb the heat from the oven, allowing the pie crust to brown and get flaky. If your pan is shiny metal or disposable foil, you can still use it, however, the heat is reflected while the pot pie bakes, making it harder to brown. This can lead to the bottom crust getting soggy from the filling.\u003c/p\u003e","category":"FAQ_4"}],"tipCategories":[{"categoryName":"Kitchen Tested","heading":"More About This Recipe","cssClass":"recipePartStory","expandOnInit":false,"expandText":"More +","collapseText":"Less -","expandEventName":"","collapseEventName":"","image":"","tips":[{"title":"","description":"Recipe meets Kitchen Tested criteria. Reviewed as part of project MSO-5941 BC Audit 200 recipes","category":"Kitchen Tested"}],"isExpandable":false},{"categoryName":"Method Note","heading":"","cssClass":"recipePartMethodNote","expandOnInit":false,"expandText":"More +","collapseText":"Less -","expandEventName":"","collapseEventName":"","image":"","tips":[{"title":"","description":"\u003cp\u003eMake a foil collar (or pie crust shield) to protect the edges of the pastry from overbrowning. Cut a circle big enough from a large piece of foil to expose only the center of the pie. Or cut a piece of foil long enough to go completely around the pie plate. With either crust shield, gently wrap the foil over the pie crust edge about halfway through the baking time.\u003c/p\u003e","category":"Method Note"}],"isExpandable":false},{"categoryName":"Rich Snippet","heading":"","cssClass":"recipePartMethodNote","expandOnInit":false,"expandText":"More +","collapseText":"Less -","expandEventName":"","collapseEventName":"","image":"","tips":[{"title":"","description":"Homemade chicken pot pie is the perfect comfort meal. This rich and creamy chicken pot pie is one of our top-rated recipes—ever. Give it a try!","category":"Rich Snippet"}],"isExpandable":false}],"nutritionInfo":{"configuration":{"showAsTable":false,"noNutritionInformationAvailableMessage":"No nutrition information available for this recipe","poweredByText":"\u003cp\u003eNutrition information for this recipe is estimated using a leading nutrition calculation application, but is an estimate only. Actual nutrition values will vary based on the exact ingredients or brands you may use.\u003c/p\u003e\n\u003ca href=\u0022http://developer.edamam.com\u0022\u003ePowered By \u003cimg src=\u0022-/media/C4F33FD467AB4A3AB59AAC4F6306AB04.ashx\u0022 alt=\u0022Edamam\u0022 /\u003e\u003c/a\u003e","nutritionChartTitle":"Nutrition Facts","nutritionInformationLabel":"Nutrition","servingSizeText":"Serving Size:","dailyValuesDisclaimer":"*Percent Daily Values are based on a 2,000 calorie diet.","percentDailyValueText":"% Daily Value","percentDailyValueFooterTitleText":"% Daily Value*:","exchangeInformationTitleText":"Exchanges:","nutritionFactsExpandText":"More Nutrition","nutritionFactsCollapseText":"Less Nutrition"},"facts":{"carbohydrateChoice":{"amountPercent":"","amountUnits":"3","title":"Carbohydrate Choice"},"vitaminA":{"amountPercent":"60%","amountUnits":"60%","title":"Vitamin A"},"vitaminC":{"amountPercent":"2%","amountUnits":"2%","title":"Vitamin C"},"calcium":{"amountPercent":"6%","amountUnits":"6%","title":"Calcium"},"iron":{"amountPercent":"20%","amountUnits":"20%","title":"Iron"},"protein":{"amountPercent":"","amountUnits":"25g","title":"Protein"},"dietaryFiber":{"amountPercent":"17%","amountUnits":"4g","title":"Dietary Fiber"},"sugars":{"amountPercent":"","amountUnits":"4g","title":"Sugars"},"totalCarbohydrate":{"amountPercent":"15%","amountUnits":"44g","title":"Total Carbohydrate"},"sodium":{"amountPercent":"50%","amountUnits":"1210mg","title":"Sodium"},"potassium":{"amountPercent":"11%","amountUnits":"400mg","title":"Potassium"},"cholesterol":{"amountPercent":"17%","amountUnits":"50mg","title":"Cholesterol"},"transFat":{"amountPercent":"","amountUnits":"2 1/2g","title":"Trans Fat"},"saturatedFat":{"amountPercent":"49%","amountUnits":"10g","title":"Saturated Fat"},"totalFat":{"amountPercent":"48%","amountUnits":"31g","title":"Total Fat"},"caloriesFromFat":{"amountPercent":"","amountUnits":"280","title":"Calories from Fat"},"calories":{"amountPercent":"","amountUnits":"560","title":"Calories"}},"servingSize":"1 Serving","exchangeInfo":"2 1/2 Starch; 0 Fruit; 0 Other Carbohydrate; 0 Skim Milk; 0 Low-Fat Milk; 0 Milk; 1 Vegetable; 0 Very Lean Meat; 2 Lean Meat; 0 High-Fat Meat; 5 Fat;","showPoweredBy":false,"showRecipeTotalTime":true,"showRecipePrepTime":true,"showCarbohydrateChoices":true},"trademarks":[],"labels":{"ingredientsHeader":"Ingredients","stepsHeader":"Instructions","stepsImageHideText":"Hide Images","stepsImageShowText":"Show Images","stepNumberText":"Step","faqHeader":"Frequently Asked Questions","tipsHeader":"\u003cp class=\u0022textFirst\u0022\u003eTips from the\u003c/p\u003e\n\u003cp class=\u0022textSecond\u0022\u003ePillsbury Kitchens\u003c/p\u003e","tipItemHeadingFormat":"tip {0}","postedBy":"By","copyright":"© {yyyy} ®/TM General Mills All Rights Reserved","showDrawerText":"Show","hideDrawerText":"Hide","expandDescriptionText":"More +","collapseDescriptionText":"Less -","ariaLiveLabelFormat":"Showing {0} through {1} of {2}","scrollLeftButtonLabel":"Scroll Left","scrollRightButtonLabel":"Scroll Right","includeScrollIndicator":false},"primaryAttributes":[{"label":"Prep Time","values":[{"text":"25","label":"min"}]},{"label":"Total","values":[{"text":"1","label":"hr"},{"text":"5","label":"min"}]},{"label":"Ingredients","values":[{"text":"10"}]},{"label":"Servings","values":[{"text":"6"}]}],"secondaryAttributes":[],"badges":[{"badgeType":3,"badgeText":"","label":"Kitchen Tested","imageUrl":"/-/media/GMI/Core-Sites/PB/Images/Shared/RecipeParts/KitchenTested_PB1_new.jpg?sc_lang=en","linkUrl":"/about-us/kitchen-tested","metaDataTags":[],"showMemberInfo":false,"matchedMetadataId":"00000000-0000-0000-0000-000000000000"},{"badgeType":2,"badgeText":"Pillsbury Pie Crust","label":"Make With","imageUrl":"/-/media/GMI/Core-Sites/PB/PB/Images/Shared/RecipeParts/make-with-logos/MakeWith_100x100_Pillsbury_PieCrust_2.jpg?sc_lang=en","linkUrl":"/products/pie-crust","metaDataTags":["c5de694c-2647-52c1-b9cc-802fa251cffe"],"showMemberInfo":false,"matchedMetadataId":"c5de694c-2647-52c1-b9cc-802fa251cffe"}],"backgroundImageUrl":"","breadcrumbs":{"links":[{"url":"/","label":"Home"},{"url":"/recipes","label":"Recipes"},{"url":"/recipes/dish-type/pot-pies","label":"Pot Pie Recipes"}],"currentPageName":"Classic Chicken Pot Pie"}};
var moduleName = 'recipeFaq';
var isVueModule = true;
GeneralMills.PandoSites.RegisterControlInstance(moduleName, configuration, componentMetadata, isVueModule)
});
})();